Tuesday, January 23, 2018

Perimeter and Area

Image result for area

We are working on perimeter and area. We have focused quite a bit on the formulas that are used to find both. In fact, your kiddo might have come home talking about the 3 good Fs in math. This is a saying that we use to help us remember to use the formula when finding perimeter and area.


Find the formula and write it down.
Fill in the formula with the correct measurements.
Find the answer and label the unit.

Image result for perimeter

Perimeter is the distance around a two-dimensional shape.

We focused on three formulas to find perimeter:

P = s + s + s (perimeter = side + side + side) - this formula can be used on any shape


P = 4 x s (perimeter = 4 x side) - this formula works for squares


Image result for perimeter of a square

P = (2 x l) + (2 x w) or P = 2(l +w); perimeter = (2 x length) + (2 x width) - this formula works for rectangles


Image result for area

Area is the size of a surface or the amount of space inside the boundary of a flat (2-dimensional) object.

We focused on one formula to find the area of a rectangle:

A = l x w (area = length x width)


Image result for area of a rectangle

Follow this link if you want more clarification on calculating perimeter and area:

Calculating Perimeter and Area

Here are a couple of songs we listened to in class:

Cat Perimeter and Area Song

Perimeter and Area Song

Here are some games that you can play to practice these skills.

Math Playground Area and Perimeter

Zoo Designer

Perim-Bots

Area Shape Game

Chicken Corral

Knights of Area and Perimeter

Please let me know if you have any questions.
The Phases of the Moon

Image result for phases of the moon

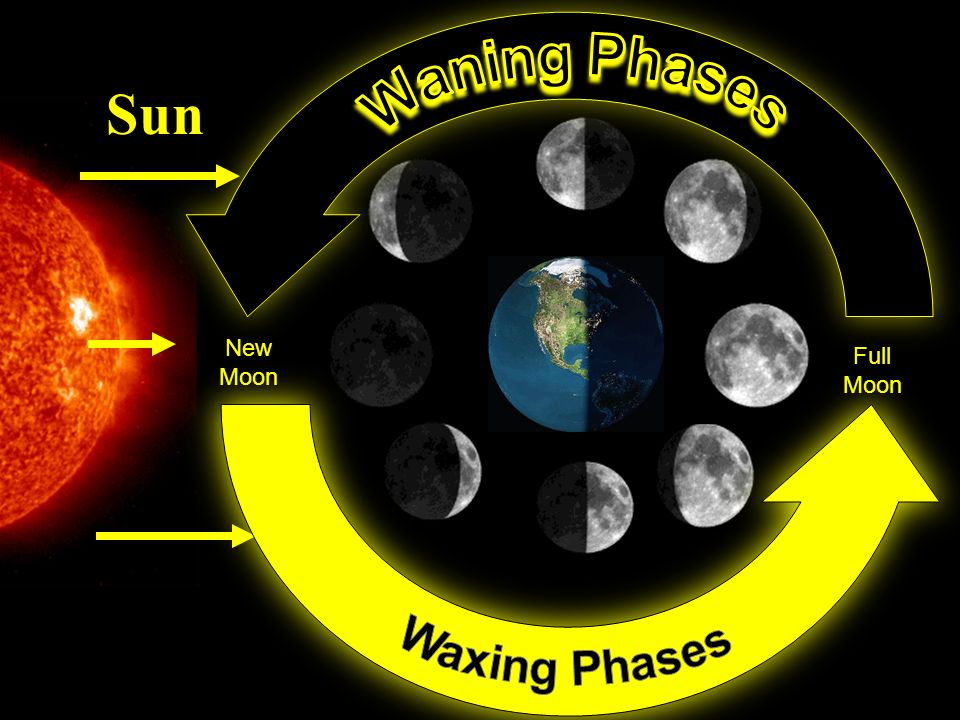
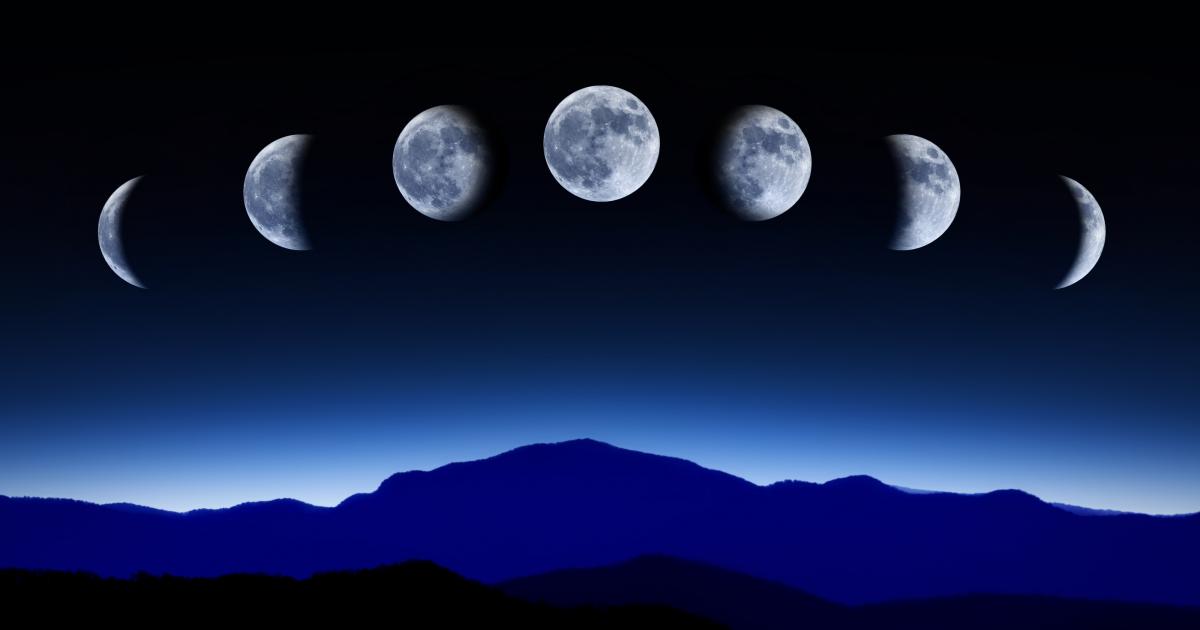
From any location on the Earth, the Moon appears to be a circular disk which, at any specific time, is illuminated to some degree by direct sunlight. Like the Earth, the Moon is a sphere which is always half illuminated by the Sun, but as the Moon orbits the Earth we get to see more or less of the illuminated half. During each lunar orbit (a lunar month), we see the Moon's appearance change from not visibly illuminated through partially illuminated to fully illuminated, then back through partially illuminated to not illuminated again. Although this cycle is a continuous process, there are eight distinct, traditionally recognized stages, called phases. The phases designate both the degree to which the Moon is illuminated and the geometric appearance of the illuminated part. These phases of the Moon, in the sequence of their occurrence (starting from New Moon), are listed below.

New Moon - The Moon's unilluminated side is facing the Earth. The Moon is not visible (except during a solar eclipse).
New moon illustration

Waxing Crescent - The Moon appears to be partly but less than one-half illuminated by direct sunlight. The fraction of the Moon's disk that is illuminated is increasing.
Waxing crescent moon illustration

First Quarter - One-half of the Moon appears to be illuminated by direct sunlight. The fraction of the Moon's disk that is illuminated is increasing.
First quarter moon illustration

Waxing Gibbous - The Moon appears to be more than one-half but not fully illuminated by direct sunlight. The fraction of the Moon's disk that is illuminated is increasing.
Waxing gibbous moon illustration

Full Moon - The Moon's illuminated side is facing the Earth. The Moon appears to be completely illuminated by direct sunlight.
Full moon illustration

Waning Gibbous - The Moon appears to be more than one-half but not fully illuminated by direct sunlight. The fraction of the Moon's disk that is illuminated is decreasing.
Waning gibbous moon illustration

Last Quarter - One-half of the Moon appears to be illuminated by direct sunlight. The fraction of the Moon's disk that is illuminated is decreasing.
Last quarter moon illustration

Waning Crescent - The Moon appears to be partly but less than one-half illuminated by direct sunlight. The fraction of the Moon's disk that is illuminated is decreasing.
Waning crescent moon illustration


Related image

Image result for phases of the moon

Image result for phases of the moon

Here are some games that help solidify the phases:


Wednesday, January 17, 2018

Shadows

Related image

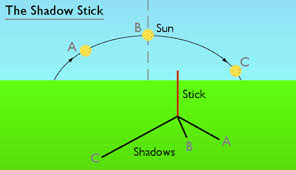
Shadows occur when an object blocks light from a source. An object that does not let light through is called opaque.

Image result for shadows in science

When the Sun is high in the sky (late spring, summer, early fall, noontime) the shadows are short.
When the Sun is at an intermediate height in the sky (spring, fall, early or late in the day) the shadows are of intermediate length.
When the Sun is low in the sky (late fall, winter, early spring, or very early or very late in the day) the shadows are the longest.
We can also learn about how the Sun moves in the sky by observing shadows.

Image result for shadows in science

Shadows work like a sun dial. The Sun rises in the East. This means that if you are facing North, the Sun will be on your right and your shadow will be on your left, sort of in the direction of 9 AM.
The Sun crosses the sky through the South and toward the West. As you face North, your shadow will progress through the 10 and 11 AM hours, be pointing northerly at Noon and move through the 1 and 2 PM hours during the afternoon.
The Sun is in the West in the afternoon. If you are facing North, your shadow will be on your right side, more or less in the 3 PM position.
The above motions of your shadow occur in the Northern Hemisphere because the Sun travels from the East, through the South and to the West in the Northern Hemisphere.

Image result for shadows in science

Here are some interactive sites about shadows:


Seasons

Image result for seasons of the earth

The Earth's seasons are not caused by the differences in the distance from the Sun throughout the year. The seasons are the result of the tilt of the Earth's axis. This tilting is what gives us the four seasons of the year - spring, summer, autumn (fall) and winter. Since the axis is tilted, different parts of the globe are oriented towards the Sun at different times of the year.

Image result for seasons of the earth

Summer is warmer than winter (in each hemisphere) because the Sun's rays hit the Earth at a more direct angle during summer than during winter and also because the days are much longer than the nights during the summer. During the winter, the Sun's rays hit the Earth at an extreme angle, and the days are very short. These effects are due to the tilt of the Earth's axis.

Image result for seasons of the earth

Here are some interactive sites on seasons:

Who Wants to be a Millionaire with Seasons

Season Simulator

Why do we have seasons?

The Science of the Seasons

Thursday, January 11, 2018

Ordering Fractions

When ordering fractions you use the same strategies as you do when comparing fractions. You just add a few more fractions to compare. :)

Image result for ordering  fractions

Draw a picture. This strategy can work with smaller fractions, but starts to get complicated with larger fractions. It is also a strategy that can lead to many mistakes, so we have to be very careful with it.

Image result for ordering  fractions


Compare with like denominators. When the denominators are the same, you are comparing the numerator. The larger numerator will be the larger fraction.


Image result for ordering fractions with like denominators


Compare with like numerators. When the numerators are the same, you are comparing the denominator. The larger the denominator, the smaller the pieces will be. Therefore, the smaller denominator will give you the larger fraction.

Image result for ordering  fractions


Compare to a benchmark fraction like 1/2. Determine how the fraction relates to ½ and that can help determine the larger or smaller fractions. We have also put them on a number line to help us clearly see how they compare.

Image result for ordering  fractions


Compare missing pieces. The fraction with the smallest piece missing will be the largest fraction.

Image result for ordering fractions by comparing the missing piece


Change all denominators to a common denominator. This allows kiddos to then compare fractions with like denominators.
Image result for ordering fractions by finding a common numeratorImage result for ordering  fractions

Here is a video that show some of these strategies:

Comparing and Ordering Fractions

Follow these links for ways to practice this skill:

Ordering Fractions Practice

Order Fractions

Drag to Order Fractions

Please let me know if you have any questions.

Thursday, January 4, 2018

Comparing Fractions

We have moved into working on comparing fractions. There are numerous ways that we have learned to do this. Here are the ways that we have been working on:

Draw a picture. This strategy can work with smaller fractions, but starts to get complicated with larger fractions.


Compare with like denominators. When the denominators are the same, you are comparing the numerator. The larger numerator will be the larger fraction.

Image result for compare fractions with like denominators

Compare with like numerators. When the numerators are the same, you are comparing the denominator. The larger the denominator, the smaller the pieces will be. Therefore, the smaller denominator will give you the larger fraction.


Compare to a benchmark fraction. Determine how the fraction relates to ½ and that can help determine the larger or smaller fractions. We have also put them on a number line to help us clearly see how they compare.


Compare missing pieces. The fraction with the smallest piece missing will be the largest fraction.

visual image of fractions

Change one denominator to make a common denominator. Sometimes you only have to change one of the denominators to make common denominators.


Change both denominators to a common denominator. This allows kiddos to then compare fractions with like denominators. These are a few strategies we have talked about relating to this:
  • Change both denominators to a common denominator.

  • Multiply the denominators by each other to find a common denominator.

  • Find the least common denominator. Finding the LCD has kiddos finding the least common multiple/product (the smallest positive number that is a multiple of two or more numbers).


Steps to find the LCD (Least Common Denominator)

Example: Compare 1/2, 1/3, 1/5

1. Identify the denominators.
  • 2, 3, 5
2. Find the Least Common Multiples (LCM) of the three denominators. The LCM is also the Least Common Denominator (LCD).
  • Multiples of 2: 2; 4; 6; 8; 10
  • Multiples of 3: 3; 6; 9; 12; 15
  • Multiples of 5: 5; 10; 15; 20; 25
  • Note that if no common denominator exists at this point, you may need to continue writing out multiples until you eventually come across a shared multiple.
  • Example: 2 x 15 = 30; 3 x 10 = 30; 5 x 6 = 30
  • The LCD = 30
3. To write equivalent fractions, multiply the numerator by the same number the denominator was multiplied by to get the common denominator.

Example: 15 x (1/2); 10 x (1/3); 6 x (1/5)

New mathematical statement: 15/30 > 10/30 > 6/30

Here are some games to help solidify these skills:


Please let me know if you have any questions.